


An ATV drive belt gives you very little warning before it lets go. One ride it still pulls hard; the next ride you smell burnt rubber and hear a rhythmic "thunk-ka-thunk" from the CVT case. By the time the noise starts, the cord inside the belt is already broken. This is not a rare failure in utility machines that are loaded to the bed rails, or in sport quads ridden hard in the dunes.
The drive belt is the core of the continuously variable transmission (CVT) on most ATVs and side-by-sides. It sits between a primary clutch mounted to the engine crankshaft and a secondary clutch connected to the driveline. As engine speed rises, the primary sheave closes, pushing the belt outward and changing the effective gear ratio. That constant flexing and friction is what wears the belt out.
An ATV drive belt works harder than most riders think. Each full-throttle shift bends the belt around one sheave, then back around the other under load. The rubber compound absorbs heat from both friction and the clutch itself. Add dust, mud, and water spray, and the belt face becomes a grinding surface that wears both belt and sheave.
High heat turns the rubber surface glassy and hard. This is normal after many hours of use, but a glazed belt should be replaced even if the top width still looks acceptable: it can no longer grip the primary sheave properly. Belts that fail suddenly usually show a broken cord under the top rubber; you can feel the soft spot by bending the belt backward between your hands.
Two dimensions matter when you evaluate belt condition: top width and outside circumference. As the belt wears, the side surfaces lose material, the top becomes narrower, and the belt sits lower in the sheave. The effective ratio changes, so the machine feels slower even though the engine revs normally. In many service manuals, replacement is due once the top width is more than about 0.5 mm below the value marked on the belt.
Operating style also controls belt life. Slow heavy pulls in high range, stop-and-go riding in sand, and repeated water crossings shorten service life rapidly. A belt that slips occasionally will not heal; the glazed rubber loses grip, extra slip creates more heat, and the belt eventually fails.
Experienced ATV techs watch for the same group of warning signs:
Open the cover and look at the belt with the machine off. Check both sides along the full length. Fraying concentrated on one side usually means clutch alignment is wrong; fraying on both sides simply means the belt is old. If the top surface is shiny and hard, treat it as worn even when the remaining rubber looks thick.
When you see or smell any of these warning signs, do not just replace the belt. Check the clutch faces at the same time. The table below lists common failure symptoms and the action that follows each one.
| Symptom | Likely cause | Check / action |
|---|---|---|
| Burnt rubber smell | Excess slip on the clutch face | Inspect belt and clean or replace as needed |
| Thunk-ka-thunk sound | Broken segment in the belt cord | Replace belt before it comes apart |
| Squeal on acceleration | Glazed surface or oil contamination | Clean sheaves; replace belt if glazed |
| Low top speed | Top width worn below specification | Measure belt width and compare with marked value |
| Frayed edges | Belt alignment or worn primary bushing | Inspect sheave faces and clutch bushings |
Before you order a belt, remove the CVT cover and measure the installed belt. Most ATV drive belts use the same basic numbering system: top width in millimeters, effective outside length in millimeters, and a vee angle that matches the clutch design. A common mid-size utility machine uses a belt marked roughly 32 x 22 x 865 mm, where the first number is the top width at maximum belt height and the second is the width at the cord line. Even if you know the machine model, measure the old belt: aftermarket part numbers do not always match the OE number exactly.
Use these steps to confirm the correct size:
If the belt is already at or below the service limit, do not use the old belt as the only pattern. A belt that is too long slips on the secondary clutch; one that is too short may not let the primary clutch close fully.
Choose a replacement with the same cross-section, length, and load rating. For machines that work in hot conditions or carry heavy loads, heat-resistant construction is not a luxury. A belt that softens when hot loses grip and wears unevenly.
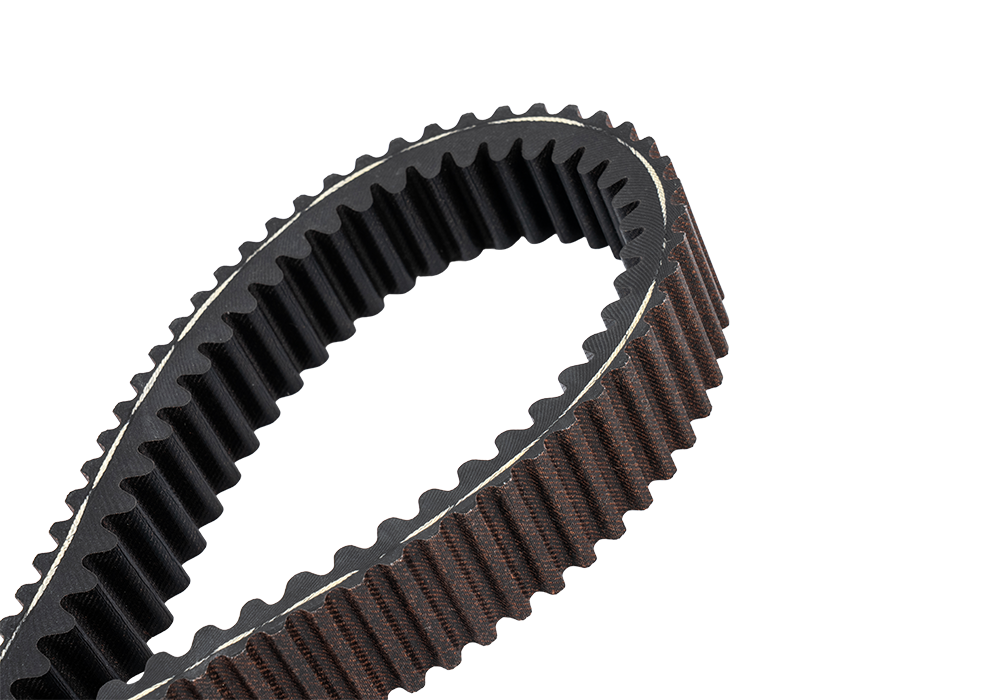 HERZ Heat-Resistant ATV Drive Belt with Aramid CordDesigned for hot and heavy-duty ATV use, this belt uses heat-resistant rubber and aramid reinforcement for durability, matching original dimensions and promising longer service life.View Product →
The Herz high-temperature ATV drive belt is designed for that kind of workload, with a heat-resistant rubber compound aimed at recreational and utility ATV applications. Match it to your original dimensions before fitting.
Swapping a belt is straightforward on most ATVs, but a few mistakes can ruin a new belt in the first hour.
The first heat cycle is important. A new belt needs to seat into the sheave angles before it is subjected to full torque. If you break it in gently, the surfaces polish instead of glaze.
Never stretch a belt over the primary sheave with a screwdriver. The pry point can cut the tensile cord. Also, do not assume a new belt is correct just because it fits; a loose belt can still touch the cover and overheat.
Most premature belt failures come from heat and contamination, not from manufacturing defects. Use low range for slow plowing or heavy pulling. Keep the drive clutch cool by checking the inlet screen and duct. After a deep water crossing, remove the CVT drain plug if fitted to let water out, and dry the belt before hard work.
Start a scheduled inspection with a top-width check. A dedicated gauge removes guesswork from the measurement.
 Belt Measuring Gauge for Wear and Tension ChecksA practical tool for ATV maintenance, this gauge helps measure belt top width, tension, and alignment, enabling timely replacement before belt failure causes costly damage.View Product →
With a gauge, you can record belt wear at each service interval and replace the belt before it strands the machine. That is cheaper than replacing a damaged clutch cover or recovering an ATV from the trail.
An ATV drive belt is a wear item with a finite service life. Check it during regular maintenance, measure the top width, and inspect the clutch surfaces at the same time. If you are not sure which belt fits your machine, start with the fitment FAQ and compare the dimensions on the product page. If you are still thinking of an ATV drive belt as if it were a timing belt, read our explanation of the difference between a drive belt and a timing belt; they handle completely different systems and are not interchangeable.



 English
 Español
 Português
 عربى
